In this Article...
AutoLISP has been a popular customization for AutoCAD. Many people use it to extend AutoCAD capabilities, do things that vanilla AutoCAD can’t. AutoLISP can also be useful to automate several process that usually need you use several tools, but with AutoLISP you may only need a few clicks. I’m not good with AutoLISP, but if you are interested to learn it with we, you can keep reading this tutorial. If you are an AutoLISP guru, I will be happy if you correct any mistakes or if you suggest better solution. So let us start to learn slowly, by creating simple program. You can also refer to AfraLISP for more AutoLISP tutorial. It’s an excellent resource!
Creating AutoLISP Application
An AutoLISP program can be created in notepad. It is a plain text, you only have to save it with file extension .lsp. However, AutoCAD itself has provided a Visual LISP editor. There are many functionalities you can use here, more useful than notepad.
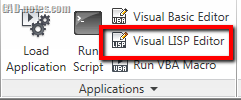
Let us use visual lisp editor instead of notepad. You can access visual lisp editor from manage tab, applications panel.

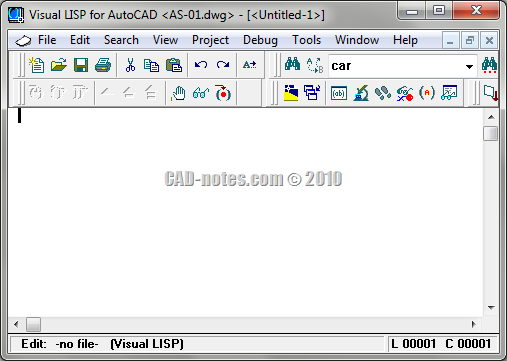
AutoCAD will open visual lisp window. This window might not look fancy, and and the icons remind me of good old Windows 3.1 icons. However, it has many specific AutoLISP programming tools that can help us.

Click new or access file>new to create a new AutoLISP program.
AutoLISP Structure
Before we start, let us see the common program structure below.
(defun c:YourProgramCommand ()
WhateverYouWantAutoCADtoDo
(princ)
)
Define a Function (defun ())
AutoLISP will start with (defun c:ProgramCommand ()). Defun stands for define for a function. If you find this:
(defun c:ZO ())
It means that we are defining ZO as a command. AutoCAD will run your program when you type ZO then enter at command line.
Most programmer will put the close parenthesis below, parallel to open parenthesis. This will be easier for us to find the parenthesis pair. Most programming language will not care where is the close parenthesis, as long as they can find it. So make sure it will be EASY FOR YOU to find it.
Inside the parenthesis, you define whatever you want AutoCAD to do. That is the tricky part. We will do a simple exercise here, to see how it works.
Your First AutoLISP Program: Zoom to Origin
We are going to create our very first program. This program will zoom to the drawing origin, no matter which part of drawing we currently see. AutoCAD tool that can do this is zoom to center. Examine what we do when we use the command.
Command: ‘_zoom
Specify corner of window, enter a scale factor (nX or nXP), or
[All/Center/Dynamic/Extents/Previous/Scale/Window/Object] <real time>: _cSpecify center point: 0,0
Enter magnification or height <1753.5398>: 2000
The red fonts are the command we input during the zoom process. This is what we do manually:
- First, we type _zoom to activate the zoom tool.
- Then AutoCAD will ask us which method you want to use. We type _c to use zoom center.
- Then AutoCAD will ask us the center point. Because we want to zoom to origin, we type 0,0.
- The last thing AutoCAD will ask is the magnification. Type the distance you want to see on your screen. I use 2000. It means AutoCAD will show 1000 to the left, and 1000 to the right. With 0,0 at the screen center. If you use imperial, you may want to change it to smaller number.
Each time we give the input, we press enter. So we type _zoom [enter] _c [enter] 0,0 [enter] 2000 [enter].
Now in your Visual LISP editor, try to type like below. Type it, do not copy and then paste it. It will not work.
(defun c:ZO ()
(command “_ZOOM” “_C” “0,0” “2000”)
(princ)
)
You know what’s written in red means right? Command will load internal AutoCAD command, then you give the parameters. Each input in quote.
This time, you can use (princ) or not using it. Adding (princ) will end the program gracefully, but without it, it will also work.
Now save this program.
Load and Run Your Program
In visual LISP editor, click load active edit window.
![]()
Now move to AutoCAD window, and try to type ZO then [enter]. Does it work?
Congratulations! You have just created your first program!
We will modify this program further. So save it and don’t loose it.


Your above program
(defun c:ZO ()
(command “_ZOOM” “_C” “0,0” “2000”)
(princ)
)
Not working on execution part.
Give another solution please
-Piyush
for mechanical engineering drawings, I would always end up with lots of macros, instead of a full blown AutoLISP routines.
(defun c:dd () (command “dimlinear”)(princ))
so I would arrange the macro in a single line like the above, so that it was easier to find my macros later.
have also seen it done like so…
(defun c:dd nil (command “dimlinear”)(princ))
I like it…good
i want learn
where you can download this program?
*where can you?..
Hi Edwin,
I got it already.
Thanks for this post.
Hi edwin,
It didnt work. After I typed and clicked load, this came out…
_$ ; error: malformed list on input_$
I checked what I typed and It is correct. So what is the problem here?