 You’ve introduced to MicroStation.You are also learned about MicroStation workspace and how DGN files work. Now we will learn how you can use mouse and navigate the view.
Mouse as a pointing device has become indispensable in all design applications, including MicroStation. Each applications may have unique function on mouse buttons. We will discuss about using mouse in MicroStation.
View control (or in other software they call it view navigation) also have important role. You will do a lot of zooming out, zooming in, panning, and other control during the design. Let’s make you comfortable with it before we continue learning MicroStation further.
Mouse Button Function

Using mouse in MicroStation is almost the same with in many other program. But we use different terms, and maybe unusual combination for many of you.
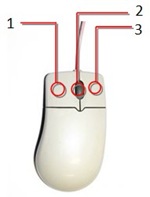
- Left click (1) is called data point (DP). When we place an object, we will need to define a data point. Either a start point, center point, next point… any kind of points! We can define it by clicking the left mouse. I guess that’s why they call it data point. We can also use data point to activate tools from task navigation and as OK/accept button.
- Right click (2) is called as Reset. Since V8 XM, we can choose not to use it as reset button. But let’s just use it as reset button first. Reset is used to cancel a running process or finish using a tool.
- Tentative button is when you press both left (1) and right (2) button at the same time. We use this for temporary snap.
- X Button is your mouse mid button. It’s only available for 3 button mouse. But I guess no body using CAD still using 2 button mouse anyway :)
- Clicking this button will activate/deactivate pan (no need to hold it).
- Clicking it twice will activate fit view. MicroStation rescale your view to show every objects in your drawing.
- Scrolling this button will zoom in/zoom out the drawing area.
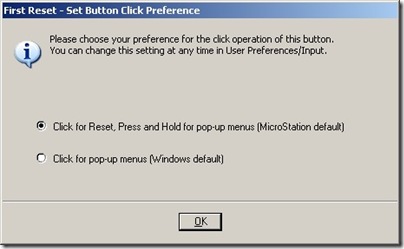
When the first time you use Reset button, you may see this dialog. MicroStation will ask you whether you want to use right click for Reset or pop up menus. I suggest you to leave the default value: use it as reset button.

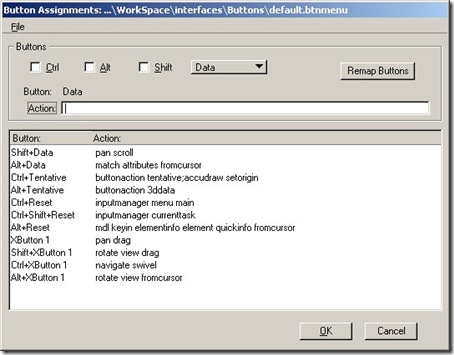
That’s the basic. We can combine the mouse button with [ctrl], [shift], and/or [alt]. You can see all this mouse function from MicroStation menu Worskpace>Button Assignment… Don’t try to change anything yet. Just take a look for what you can do with them.

View Control
![]()
You can find view control toolbar under each view. If you are familiar with Windows applications, it shouldn’t be hard. We will discuss most used tools first, and the others later. Not all of them available for 2D drawings, so you might not see some of them.
![]()
The magnifier button with the + is zoom in. Clicking it will enlarge your drawing, just like you move your eyes closer to your paper to get a better look.
![]()
We can use window area to magnify selected area in our drawing. You need to define two data points when you use this tool.
![]()
Fit view will adjust the drawing view scale automatically until you can see all of your object. Alternatively, you can double click your X-button.
![]()
Pan view is used to pan or move your drawing area. Just like you move your paper around to see another part of your drawing. Activate it, and click your data point to pan view. Alternatively, you can press your X-button.
![]()
These are just like back and forth button. Just like undo and redo. But only for view control tools.
Hint: If you use AutoCAD, undo and redo will also affect the view control. But not in MicroStation.
We will discuss more about MicroStation view control later.


hi! everytime i create a new 3d file, i cant see the solid modeling on my toolbar. obly see the drawing. how can i access it or turn it on?
hi edwin! thanks for the tutorials. I'm an AutoCAD user since 2005 and jumping on to Microstation is a totally new experience. Quite hard because AutoCAD is so different. thanks again!
Thank you very much. Very helpful for beginners.
Thank you very much for these tutorials, I began to think that idiot before finding your tutorial. The explanations are very clear and very useful for a beginner, I use Autodesk 3ds Max, but for work I have to learn Microstation (by my self), the vaccations is great, now I begin to understand something.
I'm glad that you like it Crina :)
Thank you for these. Very helpful to get the basics!