In this Article...
Sketching in Revit is quite different with drafting in AutoCAD. It can be very tricky. In this article, we will explore some tricks we can use for sketching.
There are many tools that require you to create sketch: railing path, floor boundary, ceiling, detailing and drafting, creating families, etc. You need to sketch!
In this tutorial, we are going to use roof as example. For other tools, it might be slightly different. But the concept should be the same. In this post, we are focusing on creating closed polygon. You might need to sketch many closed polygons even for basic objects, such as profiles, roofs, and floors.
The Draw Tools
Some tools allow us to pick other object -such as walls- and create line(s) from our picks. In this draw panel, you can see the default active tool is pick walls. You can change the draw mode to line, rectangle, or other mode as necessary.

Sketching Manually
We can draw manually to create sketch. We can draw lines, rectangles, circles, arc, etc. The techniques is the same with placing walls. We click the start point, then define the end point. We also need to pay attention to option bar.
Defines slope is available for roof footprint, but not for other sketch.
![]()
Chain works for lines only. With chain option active, the next segment will use the previous segments end point as starting point. If you do not activate it, then when creating each segment you will have to define two points: start point and end point.
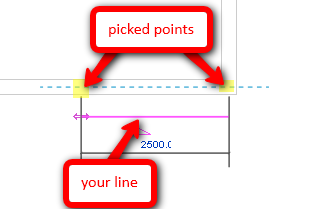
If you fill the offset value other than 0.0 then your line will be created offset from your pick points.

Picking Reference
![]() In creating roofs or floors, we can pick walls to create lines.
In creating roofs or floors, we can pick walls to create lines.
The idea of this tool is you can pick walls instead of snapping and picking points. The options are not too different.
![]()
However, offset in line option bar, now become overhang when you pick walls.
The other option is ‘extend to wall core’.
Let’s refresh a bit. When we draw using line mode, we can snap to wall layers, even we can’t see it.

But we can’t do it with pick walls mode. The ‘extend to wall core’ option allow us to pick the wall core (only the wall core).

To refresh your memory, you can see the wall layers definition in wall properties.

Selecting a Chain of Walls
Instead of picking a wall at a time, we can select a chain of walls. Move your pointer over a wall until you see the wall highlighted. Press [tab] once. Revit will try to find touching walls and highlight them. Click your mouse to select it.
Editing and Modifying Lines
Sometimes it’s easier to just draw lines and modify them later. When we use pick walls mode, most likely we will create a non-closed polygon. We need to modify our sketch to close it.
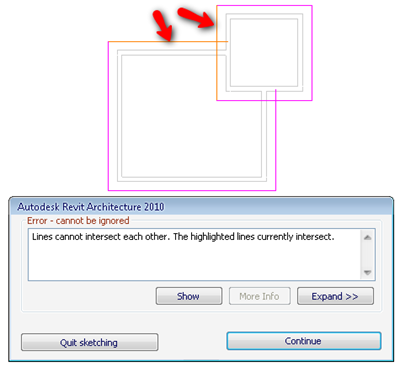
If we insist to finish the sketch (in this case: roof) Revit will show a warning dialog. You can also see the problem highlighted in your drawing. If you can’t see it, try to click show button in the dialog. Revit will open related view if necessary and zoom in to the problem.

The easiest way to close the polygon is by using trim tool. Activate the trim tool, and pick the lines at positions pointed by the arrows. You can use trim to cut or extend lines to intersect.

Snap Override
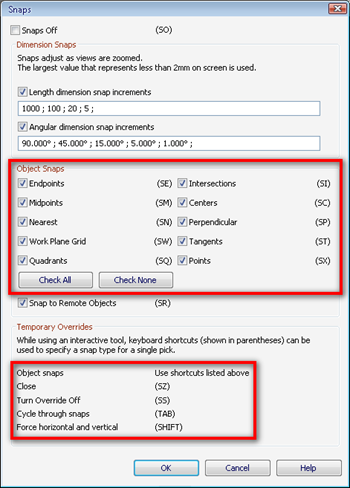
The last trick you may need to know is using snap overrides. Revit by default will show you snap points you can use. However, when our design become complicated, Revit is not showing us the desired snap mode. We can override the snap mode using these shortcuts:

You can see or modify these options by accessing Revit ribbon>Manage Tab>Settings>Snap.


You can't compare AutoCAD and Revit directly. AutoCAD probably is the strongest application in drafting, while sketching in Revit can looks so difficult (but not impossible). They have different concept.
Thank you for sharing this information.I would like to know advantage of revit sketching over auto cad?
Regards,
cad drafting services
Hello,
Ever since i started using Revit MEP (in 2007), i have been obsessed with customizing my own keyboard shortcuts. I was delighted when 2010 came out, and i could program my shortcuts on the fly. I am currently using 2011. One set of shortcuts that i have been unable to program is sub-functions of a command…
for example:
If i wanted to quickly get into the draw detail line command, and then Draw Rectangle, or Circle, or Arc etc.
Browsing the keyboard shortcuts menu, these commands are listed i.e.
Line:Rectangle, Line:Circle, Line:Spline
Any thoughts?
I've never went that far. I'll try to take a look and update it if I'm succeed.
Have you tried the ribbon shortcuts? I know the two chars shortcut is better, but it worth to try.