In this Article...
Before we continue, let’s review what we have learned in Revit family tutorial:
- We have created a simple profile and use it for creating wall sweep.
- We added parameters and create several family types.
- We created a very simple 3D table using solid extrusion and blend.
- We added parameters to the simple table.
- We created a baluster panel. We learn how to use reference planes in creating Revit families.
Now, we are going to define a railing definition, like we see below. Pretty cool, isn’t it?
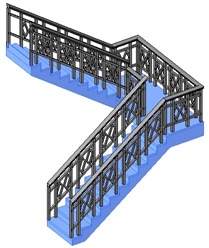
Creating Railing Profiles, Baluster Panel, and Baluster Post
Revit railing is an assembly. We assemble railings, baluster posts, and baluster panels. We have created a baluster panel, now we need to create the profiles and the baluster post.
Creating Railing Handle
Create a new profile using Metric Profile-Rail.rft template. Create a profile for your railing handle. You can create your own profile, or something similar like this.
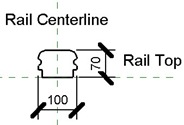
Save the file. Give it name railing handle.
Creating Railing Profile
We need to create another profile to form the railing. Create a new profile using template: Metric Profile.rft. Create a rectangle like this.
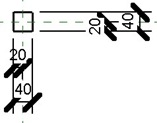
Save the file, give it name railing profile.
Creating Baluster Post
Revit has different family template for each family, so be careful selecting your template. Let’s use the Metric Baluster-Post.rft template. Create a solid with the profile size 50×50, and the height value equal to baluster height. You need to create the profile on the floor plan view.
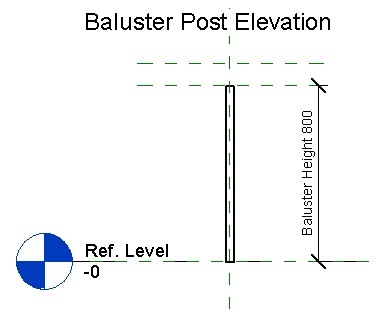
Change the baluster height to 800.
Creating Railing Assembly
Now that we have defined the baluster post, baluster panel, and railing profiles, we can assemble the railing. Railing is not defined in a separate family file. We need to define it within a Revit project. So, create a new Revit project and load all the families to that project.
If you haven’t create the families by yourself (I strongly suggest you to do it, to get familiar with creating Revit families), you can download them in this file.
Now we have created a new project and load all the components. Let’s assemble them! Activate railing tool. It’s in Revit ribbon, home tab, circulation panel.

You will see the contextual tab in your Revit ribbon. Click the Railing properties in Element panel.

Click edit type in type properties dialog, this will open another dialog box. We will define the railing assembly definition here. But before we continue, create a duplicate of this railing. Click duplicate, and give the new railing name: wrought iron railing.
Defining Rail Structure
Click the rail structure button, under construction group.
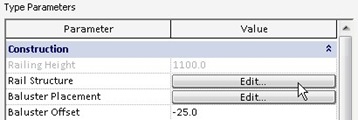
We will see a list how we place our railing. Change the name, height, offset, and profile like below. You can add more profile by clicking insert button at the bottom of the list. It should be easy after what you’ve been through :) Changing the name is optional, but I recommend you to do it, so we can refer to them easier later.

Defining Baluster Placement
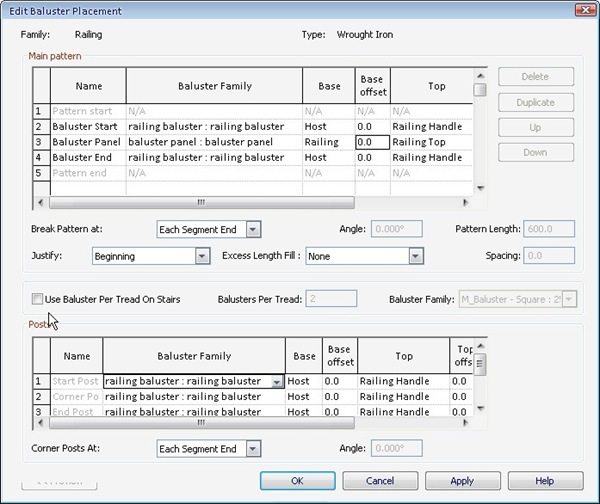
This is similar to defining the railing structure. But there are many other options available here. Refer the name to previous steps.
- In the main pattern area, just like we did before, change the name and baluster family.
- Change the base to host, and the top to railing top for the baluster post. This will define the baluster from your floor/stair as host to the top most profile.
- Change the base to railing bottom and top to railing top for baluster panel. This will define the baluster from the bottom railing to top railing.
- Change the distance from previous value to 200 for all baluster.
That’s it. But we need to define it more so we can use it for stairs too. Turn off the Use Baluster Per Thread On Stairs option.
Optional: You may need to define the post (in post section) to railing baluster.
Try to create your railing, and try to create it on stair also.
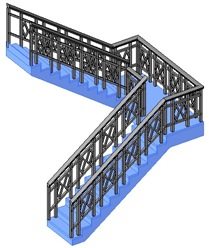
There are so many option in creating railing. You can try to explore what they are for. But I believe you get the concept by now. If there are something not clear (especially if you just follow CAD Notes recently), don’t hesitate to ask in comments area.


Hi Edwin,
the files within railing zip file are corrupt when trying to extract them. Could you possibly re-upload or provide link? thanks so much!
Hi Mike,
I’m sorry the file is broken. I tried to find a backup from my archive but can’t find it. However, you can create them if you follow the tutorial series from the start.
Hi Sir Edwin,
Great! now it’s working. Thank you so much.
Cheers,
Alfie
Hi Sir Edwin,
For the railing components the file is broken, can you please upload them once more.
Thank you.
Regards,
Alfie Gallandez
Alfie,
I tried to download it and it works fine on my side. Can you try to download it again?
Hai,This is Prsanta from India, working as Design Engineer. Please clarify my doubt in AutoCAD. What is the function of Title Border or AMTITLE. MY NO. IS +91 7569076902.
I want to create a baluster panel that only repeats once in the middle, and then regular posts around it, how do I do that?
Very useful, thanks!
Perfect, thank you very much,
Arspi, Greece