In this Article...
 We have discussed how you can use AccuDraw and AccuSnap as tools for drawing precisely in MicroStation. Now we are going to do a little exercise to use them. If you haven’t created a tutorial project, do it now. We are started to use them.
Download accudraw_shortcut.dgn and replace the previous one with it. I will update all the files later, so you won’t need to download them every time we use an exercise file.
Before we begin the exercise, there are two AccuDraw features I would like to introduce you: AccuDraw calculator and AccuDraw shortcuts.
AccuDraw Calculator
AccuDraw has a built-in calculator function. This is very helpful if you need to use mathematical calculation when placing a data point.
You can simply click your first data point, move your pointer to a reference point. As you know, the value in AccuDraw field will show the exact distance between your two points. Don’t click the data point yet. Just move your pointer to the second point, and press the equation operator. Type the equation you wanted, then AccuDraw will calculate it for you!
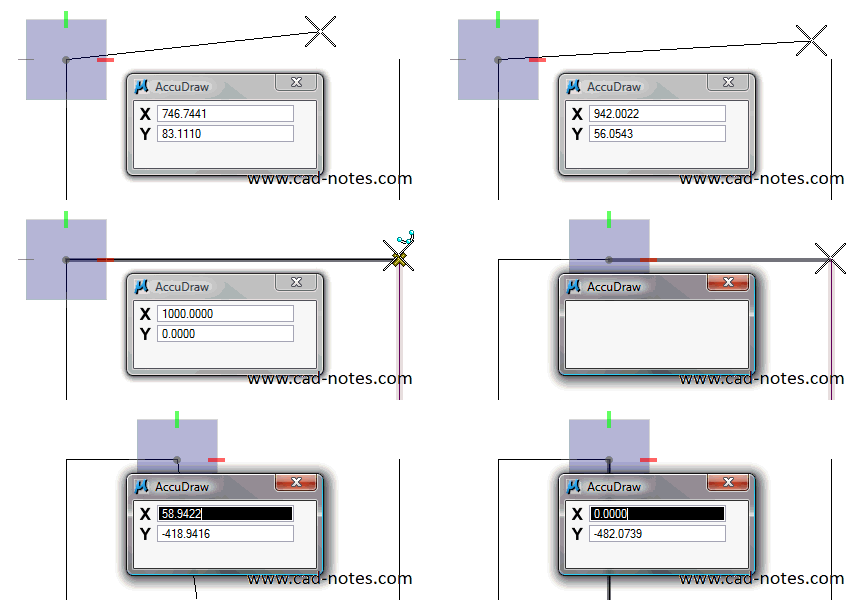
Tips: For + or – operator, you need to lock the X or Y value first. Otherwise, AccuDraw will think you want to input negative or positive value. You can lock it after your pointer at the reference point and press X for locking X axis value (or Y for Y axis value).
AccuDraw Shortcut
AccuDraw shortcut is a very cool feature in MicroStation. You can control many AccuDraw behavior with it.
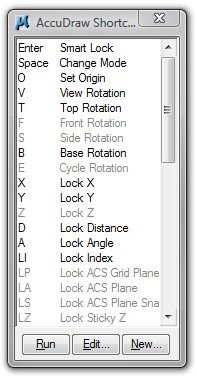
Make sure AccuDraw get the focus by pressing [f11], then press [?]. You can see the list of the whole AccuDraw shortcuts.
You actually have used several of them: [enter] for smart lock, [Space] for changing AccuDraw mode from rectangular to polar coordinate and vise versa, [V] for view rotation, [X] for lock X, and [Y] for lock Y.
Exercise: Using AccuDraw and AccuSnap
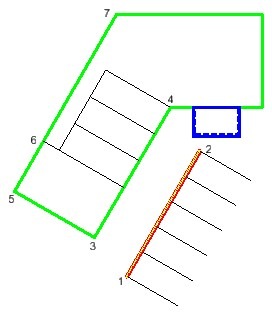
Open the accudraw_shortcut.dgn. This is an unfinished building plan. We are going to finish it.
Drawing the parking lots mark
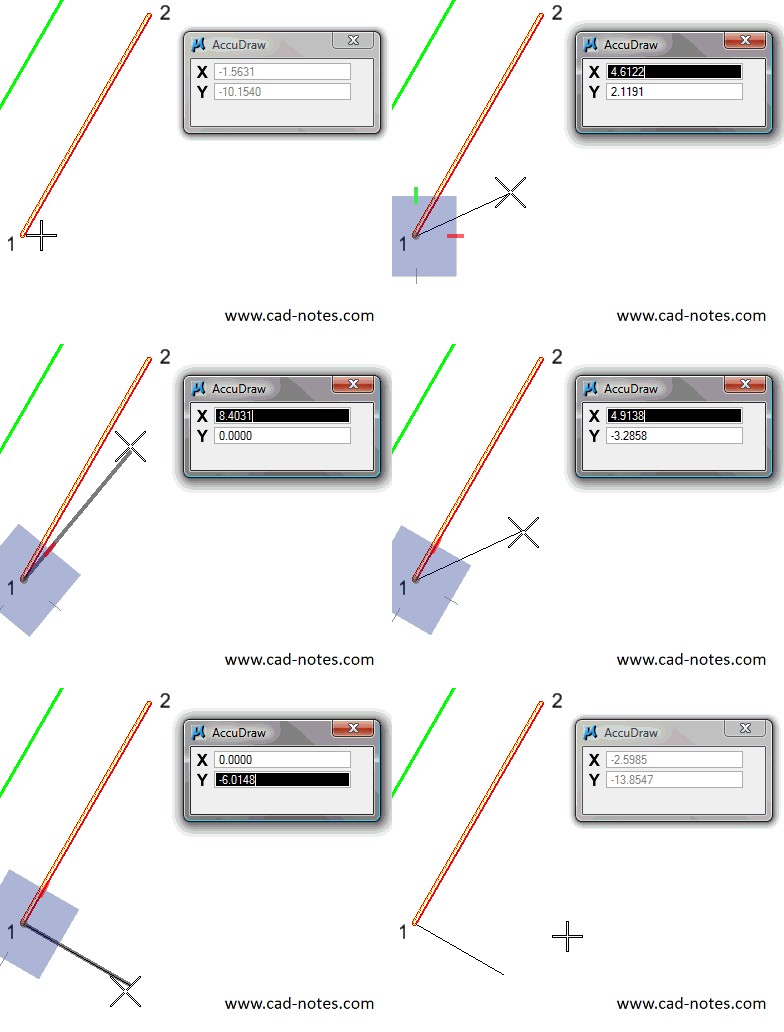
Activate SmartLine. Snap to point 1 and click data point. Now we need to draw the line perpendicular to the curb. Press [R] then [Q] to activate rotate quick using AccuDraw shortcut. Snap to point 2 and click data point.
The AccuDraw compass is now rotated following the curb orientation. Now we can draw the mark line easily. Draw a 5 m length (this file working unit is set to m).
Copying Mark
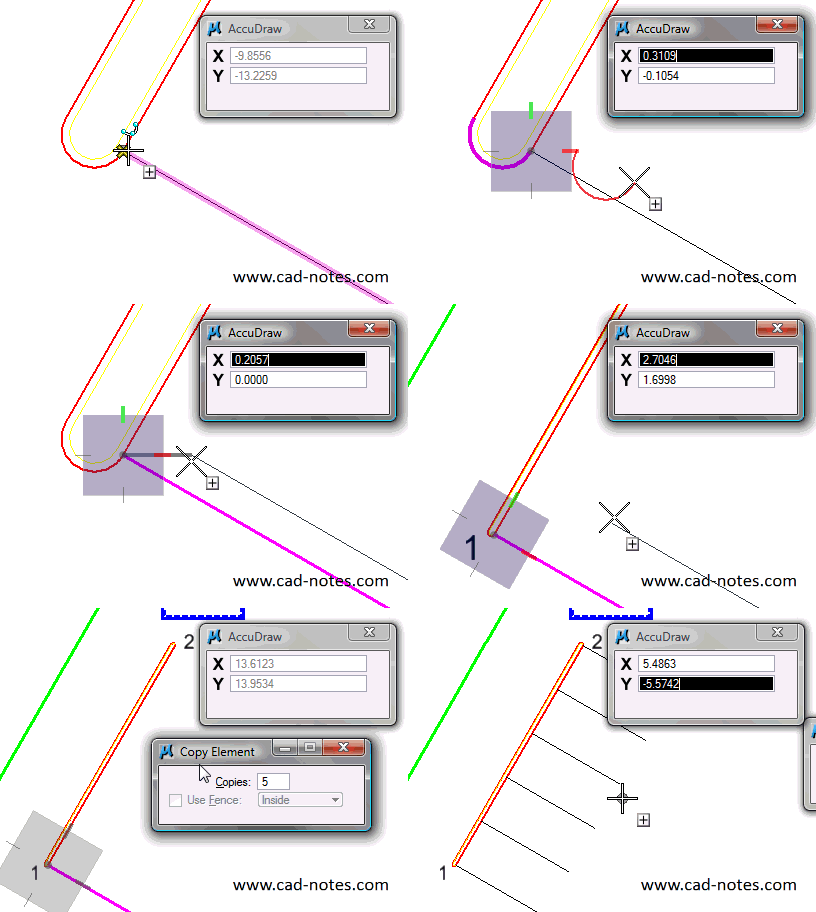
This time, activate copy tool.

Change the copies value in copy element settings to 5.
Click data point on point (1). You should select the line you just draw. You can tell by moving your pointer and see which objects in your pointer now. Try to click Reset button on your mouse. This will cycle your selection for overlapping objects in that point. If it doesn’t, zoom in and try again. Make sure you select the line.
We will have to rotate our AccuDraw axis. This time we use [R] then [E], rotate element. Select the line we created before. RQ and RE work just the same. The only difference is, RQ using points as reference, RE using drawing element. One more thing: after using RE, the axis rotation doesn’t come back to default. You need to reset it by pressing [V].
Move your pointer to point (2) until you see the snap point. Press [/] to divide the distance. Type 5. Click data point.
Finishing the Building Center Lines
I will let you finish this MicroStation exercise by your own. Try to finish it like this image. If you have problem, don’t hesitate to discuss it here!


Good day!
I just want to ask why the cursor or line is not showing whenever I create lie/smart line.
But if I create the rectangle, I can easily see it..I dont know if there is something wrong with the line properties or settings.
Can you please help me on how to resolve this problem.
Thank you
this is a great tutorial , I really like the way that you have laid it out , but it would have been extra helpful if you posted a youtube video as well.
thanks ,
if you already have could you send me the link
still cant understand.. which point to select what not to select n awwwwww… just crazy.. plzzzz explain it in a easier manner..
how to copy..??
Emm, and how do I "press the equation operator"?
Edwin,
I could draw in some lines and make them parallel and perpendicular. However, I expected to find a vertex at 6, and it appears that there is not. The lines for the three spaces are definitely longer than 5 meters, but I can't tell what the measurement should be. Did I miss something, or were we just supposed to make them any length?
You are right. There is no vertex on 6. You must use perpendicular snap to create the line.
I can't find where there's an 'E' to go with my 'R', when I want to rotate to en element. Is there something I'm missing or has a newer version gone a different route?
Your tutorial has been very helpful thus far!!!
The file i downloaded was a read only though and i was not able to add anything or edit it in anyway.
thanks again!!!
Dear Edwin Prakoso,
Your tutorial are simply great.
I have recently started using Microstation & found your tutorials to be most helpful.
But as an Autocad user I have been giving commands using shortcut keys, e.g. L for Line or C for circle etc..
Can you please provide me a list of compartive Commands of microstation wrt those of Autocad.
I mean to create something I can pick from screen icon in Microstation but what about other commands.
Does Microstation has Shortkeys option for all other commands.
Hello.
I am starting using microstation, and your tutorials are simply great.
FYI: the file I had for this exercise was already complete, so I had to delete the parking lines before redrawing them again… exercise was even more complete than intended!
Thanks Maxime :)
That's the <del>bad</del> good thing about MicroStation file saving behavior. You don't need to press save to save the file. And obviously not good for creating tutorials :) I'll fix it later. Thanks for notifying.