In this Article...
When we draw, we need to draw same objects repeatedly. It can be a standard objects/parts, annotation, symbol, etc. In the past, when we have to draw manually, we have a transparent paper that contains those symbol. We place it above our paper, scratch it… and voila! We have it on our drawing.
MicroStation cell have the similar concept. We can define and save the objects on a cell library. And whenever we need it, we just look for it in our library and use it. No need to draw the same object repeatedly. In this post, we will discuss how we can use existing MicroStation cell library. On the next post, we will discuss how we can create our own MicroStation cell library.
Download this design file and this cell library file, and save it to your computer. We will use it in this MicroStation tutorial.
Before you continue, open the place cell.dgn.
Loading Cell Library
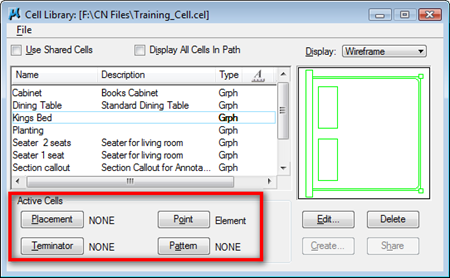
Before we can use the cell, we need to load a MicroStation cell library. You can define which cell library you want to use from cell library dialog box. Access it from MicroStation menu element>cell. MicroStation will open a dialog box. From this cell library dialog, access file>attach file… Find the file you have downloaded and attach it. You will see the cell list. All the cells are in the cell library file.
Pay attention that you can attach a folder. It means that if you have multiple cell library inside a folder, you can attach them at once by selecting the folder. Cell library usually contain cell for similar purposes/discipline. However, if you have large cell library, some people prefer to use folders to manage the files too.

Now see the buttons in red rectangle. You can define how do you want to use this cell. The most basic use of MicroStation cell is for placement. You simply select a cell and place it to your drawing. We will see how we can use it for other purpose later.
Click on seater 2 seats. Click Placement button. Now you should see NONE has changed to the cell name. Now you have define the active cell for placement. You may close this dialog.
Placing Cell

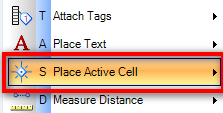
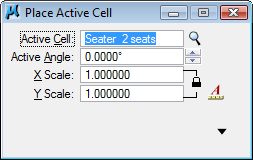
Access place active cell from task navigation. Now you can see the active MicroStation cell on your pointer, and dynamically determine the cell location. Click your mouse at the desired position.
You can change several settings before you place it. These are the basic settings for placing cell.

Tips: You can double click the cell name in cell library list. This will also activate place active cell.
Understanding Shared Cell
You can stretch MicroStation cell and change the text data field value within cell. So if you have similar objects, but have different sizes, you can create a cell and stretch it later. However, there are some cells that you don’t need to modify. To prevent this type of cell being modified, you can use shared cell. Activate use shared cell in cell library dialog box.

The other advantage of using shared cell is, you can reduce your MicroStation design files. Shared cells using the same information for every instance in your drawing. Without shared cell, if you have 100 cells, then you have 100 cell information! I’m not sure if this is still an issue now, as any new computer now can handle quite a large file easily.
Exercise
Place available cells to your exercise file. Feel free to design your own room!
You may try to use some sample cells in the sample project. For example in C:\ProgramData\Bentley\MicroStation\WorkSpace\Projects\Examples\Civil\cell (folder path in Vista)


